January 19th, 2011
I have a whole bunch of posts planned or already in the works (making/keeping budgets, rocktastic things to do with spray paint, WTF is up with my FICO score?), but eventually, I’m going to draw a blank. I will run out of ideas and then I will be PARALYZED with fear. Fear and loathing. So, I’m taking requests.
Is there something you’ve always wanted to know how to do?
Like, I’m about to drop a “Smokey Eyes for Girls Who Don’t Know Nothin’ about Make-up” (title, uh, pending) because it’s something I’ve been too intimidated to master – and something my friend, Laura is really, really good at. Then I’m gonna share how to make a kick-ass chicken soup. Because (unless, of course, you’re of the vegetarian/vegan persuasion or you hate chicken. or soup), it’s a staple. And way easier than you’d think.
So much learning!
If you’ve got a particular request, hit me with your questions either by email or comments. And hey, if you want to share some of your mad skills or be an interview subject, I’m wildly enthusiastic about that, too!
January 19th, 2011
Everyone is going to ask. Caterers, florists, photographers. “What’s the theme of your wedding?”
First, you’ll be happy to learn that you don’t have to choose a wedding theme right from the get-go – or even choose one at all! I know, that’s crazy talk in the bridal world but the truth is, the mojo of your wedding is going to be set by you and your guests, even if there aren’t any words to describe it. And in the end, the theme is just a template to (hopefully) make the rest of the eleventy billion wedding decisions just a little bit easier.
Where you want to get married (cathedral, country chapel, hotel ballroom, backyard, Jamaican beach) will have a lot of impact on how you plan out the details. But to narrow it down a bit, start out by answering a few questions about you and your dude. Are you two…
- Traditional or Modern
- Casual or Formal
- Rustic or Chic
- Really into pirates
If you’re the satin and tulle kinda gal, a casual wedding is probably not in the cards. But you know what? It’s your wedding and if you want to prance around in your Cinderella gear at Chuck-E-Cheese for your wedding, you go right ahead. We’re not much for conforming. We’re just trying to help with the whole cohesion bit. Like I said, to make the next several months of decision making easier.
Amanda’s Got a Feeling
When I first dove into planning mode, I had visions of royal blues, sage greens, teals and feathers. Peacock feathers, to be exact. I wanted them in bouquets and in 1940’s inspired hair pins. It was going to be beautiful and elegant and … totally wrong for our venue. So, back to the drawing board!
Once I picked my dress and the venue had been decided upon, my fiancé and I sat down and talked about what we wanted our wedding to feel like. Not look—feel. We decided we weren’t formal, 4 forks, two spoons and a butter knife people; we were BBQ and home cooking people.
Our wedding needed to be laid back, we wanted our guests to feel like…our guests, like at-our-house-chillin-on-the-couch kind of guests. We didn’t rush to pick the different elements of our wedding, we waited until inspiration struck. The outcome was a comfortable wedding where people were directed by old wooden fence post signs, given cookies as they arrived at the ceremony, ate as much down home cooking as they could and topped it off with more cookies, cupcakes, and sparklers…because everyone plays with sparklers on their friends’ couches, right? Yea, I thought so.
Heather is Clearly Not a Girl
My sister was the first person to ask, “What’s your theme?” I was clueless. “Um, I don’t know. The one where I wear a dress and people come? What’s a theme?! I’m clearly not a girl.”
So, yeah, at first, it was overwhelming. But once I got to picking things like venue, time of day and the mood I wanted to set, the theme of our wedding developed pretty organically. We chose a local winery for the venue, Italy for a honeymoon destination and as for the mood – I just wanted a sweet, simple, sophisticated party where folks could eat, drink and laugh. Enter, “La dolce vita,” an actual theme (!) that encompassed all of those things. From there, we’ve been able to choose food (Italian, duh), music (Dean Martin, Frank Sinatra) and lots of smaller, more personal details – even save-the-dates, inspired by vintage wine labels – to make the party something special (even though I hate the word special).
A few Inspiration Tactics
- Grab some magazines and start clipping. Pictures, words. Anything that fits who you are and what you like. Lay them out on your kitchen table and start putting a story together.
- Start with the flowers. A bouquet of wildflowers or white lilies? Tulips or succulents?
- Let your mom take over. I promise it won’t be long and you’ll know exactly what you want. heh.
Okay, married ladies, your turn. What was your theme? And better yet – what was the inspiration behind it?
 |
Amanda McCain Himes, a Colorado native, made her own DIY wedding look like… well, a piece of cake. |
January 6th, 2011
Did you know you can subscribe to This Fish Features RSS? You can! And when you do, then you will know when there’s hot, fresh-from-the-oven content (which I hope will be weekly, at a minimum), including Book Club announcements.
January 3rd, 2011
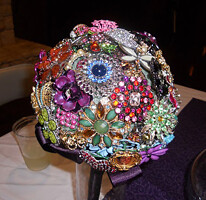
I first saw a brooch bouquet while perusing one of the million and fifty wedding blogs I was addicted to casually browsing in search of inspiration. It took me a .02 seconds to realize I had to have one and immediately popped on over to Etsy to begin my search. I found several beautiful brooch bouquets… with big UGLY price tags. Determined to have one, I set out on a mission to make the bouquet.
I wanted my bouquet to have a lot of sentimental value, so I started gathering brooches from family members. I let my family and my future in-laws know what I was doing, sent them pictures of bouquets I found online and asked them if they could contribute to the effort. Everyone was excited to help and made it their mission to each give me a meaningful brooch. I loved every one of them but when I realized my bouquet would require more (mine totaled 80 brooches), I headed out to flee markets.
**Special Wedding Tip: Exploit the fact that you are getting married. Every time I purchased a brooch, I let the person know it was for my wedding. This ALWAYS scored me a better deal. Also, buy as many from each vendors as possible; the more you buy, the more likely they are to make a deal.
Things You Will Need:
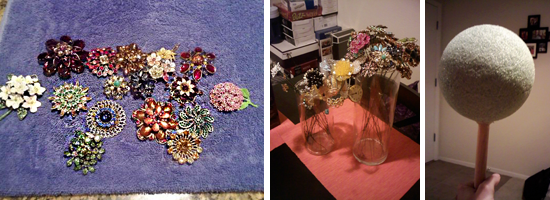
- Brooches (like I said before, mine took 80 to cover a 6” diameter sphere)
- Floral Wire—20lb—about $3 for 80ct. at Hobby Lobby (you will need as many wires as you have brooches)
- 6” Styrofoam Ball—$6 at Hobby Lobby
- 1” Dowel Rod—$.69 at Hobby Lobby
- 1” Satin Ribbon in whatever color ribbon you wish
- Hot Glue Gun and Glue
- Small Needle Nose Pliers
**Tip: You can print off 40% off coupons to most major craft stores online!
To Assemble:
Step One: Clean the brooches! If you’re like me and found most of your brooches as flea markets, chances are good they have several years worth of dust and dirt on them. To clean mine, I filled a big bowel with warm soapy water, brushed them with an old, soft bristle toothbrush, and then rinsed them in a colander. Very professional, I know, but it worked!
Step Two: Use the pliers to wire the back of each brooch with floral wire so that it looks like a flower with a stem.
Step Three: Cut down the wire from each brooch to about 3”
Step Four: Cut the dowel rod down to 9” long
Step Five: Cut a hole in the Styrofoam ball just a smidge smaller than the dowel rod’s diameter and about 2” deep. Fire up the glue gun, glue about the first inch of the dowel and push it into the Styrofoam. Make sure it’s good and sturdy because this bouquet weighs a ton.
Step Six: I organized my brooches into three categories: the sentimental brooches from family and friends, favorite brooches I had purchased, and my not so favorite “filler” brooches. Beginning with the not so favorites, push the wires into the Styrofoam until the brooch is firmly up against it. Continue to do this and evenly spread the not-so-favorites around. These act as “filler” so that you won’t see the Styrofoam once you get all your favorites in.
Step Seven: Repeat step five with all you favorites. Keep in mind the special brooches and their placement (i.e.: one from my fiancé I placed at the top so I could always see it, and ones from my family I placed on the sides so they would photograph well).
Hint! As you are placing brooches, turn the bouquet upside down and shake it gently, if any brooches come loose, grab the hot glue gun and glue the wire in.
Step Eight: Once all the brooches are in place, grab your ribbon. Cut it into 5” stands and begin to make loops at the base of the Styrofoam. To do this, glue about ½” of ribbon to the top of the dowel where it meets the Styrofoam, then double it over and glue the other end of the ribbon at the same point—continue this all the way around the base of the Styrofoam.
Step Nine: With the remaining ribbon, again glue ½” of ribbon to the dowel, this time starting at the bottom, and begin to spirally wrap the ribbon up the dowel, sporadically placing drops of glue on the dowel to hold the ribbon in place. Wrap the ribbon a few extra times at the top of the dowel to insure the ribbon loops are fully covered.
Step Ten: Find a vase tall enough to set you shiny bouquet in, step back and admire it. Then go do some push-ups because it probably weighs a ton!
|
Amanda McCain Himes, a Colorado native, made her own DIY wedding look like… well, a piece of cake. |
|
Contributors
Got a great story that you want to contribute? Drop me a line! We'll talk. No big whoop. |